You’ve just received the call with your radon test results. The number is above 4.0 pCi/L—the EPA’s action level. A wave of concern washes over you. This invisible, odorless gas is in your home, the place where your family should feel safest. For homeowners in Bowie, where the unique soil composition can lead to higher radon levels, this is an unfortunate reality many face.
The good news is that you’ve taken the most critical step: awareness. The next step, radon removal, might seem daunting. Visions of massive construction projects, torn-apart basements, and sky-high bills can fuel anxiety. What will the process actually involve? How long will it take? Will it truly make your home safe again?
This guide will walk you through the entire process of professional Radon Removal Bowie MD. We’ll demystify each step, from the initial consultation to the final test, so you know exactly what to expect. This isn't just about installing a system; it's about restoring your peace of mind.
The Foundation: Confirming the Problem with a Radon Inspection
Before any removal can begin, you need a clear understanding of the problem. While you may have started with a simple DIY test, a professional Radon Inspection Bowie MD is often the best precursor to mitigation.
- Why a Pro Inspection? A certified professional uses continuous radon monitors that provide precise, detailed data over a 48-hour period. This not only confirms the initial reading but also helps the mitigation expert understand how radon is moving through your home. They can identify potential entry points and assess your home's specific structure—whether you have a basement, a crawl space, or a slab-on-grade foundation.
- The Consultation: This is a conversation, not a sales pitch. A reputable contractor will review your test results, answer your questions, and explain the science behind radon mitigation. They will then perform a visual assessment of your home to plan the most effective and least invasive system design.
The Radon Removal Process: A Step-by-Step Walkthrough
Professional radon mitigation is a systematic process. When performed by a certified expert, it is surprisingly efficient and minimally disruptive.
Step 1: System Design and the Quote
The contractor will present you with a detailed plan for your home. This includes:
- The Best System Type: For most Bowie homes, this will be an Active Soil Depressurization (ASD) system. This is the gold standard, proven to reduce radon levels by up to 99%.
- The Proposed Route: They will show where the suction point will be created (often in the basement floor or a crawl space) and the path the PVC pipe will take—either up through the interior of the house and into the attic or along the exterior wall.
- A Detailed Quote: This should be a fixed price, outlining all labor, materials, and the specific fan unit that will be used. There should be no hidden fees.
Step 2: Preparation and Installation Day
On installation day, the crew will arrive with all the necessary equipment. The process typically unfolds as follows:
- Protecting Your Home: A professional team will lay down drop cloths to protect your floors and will work carefully to keep dust and disruption to a minimum.
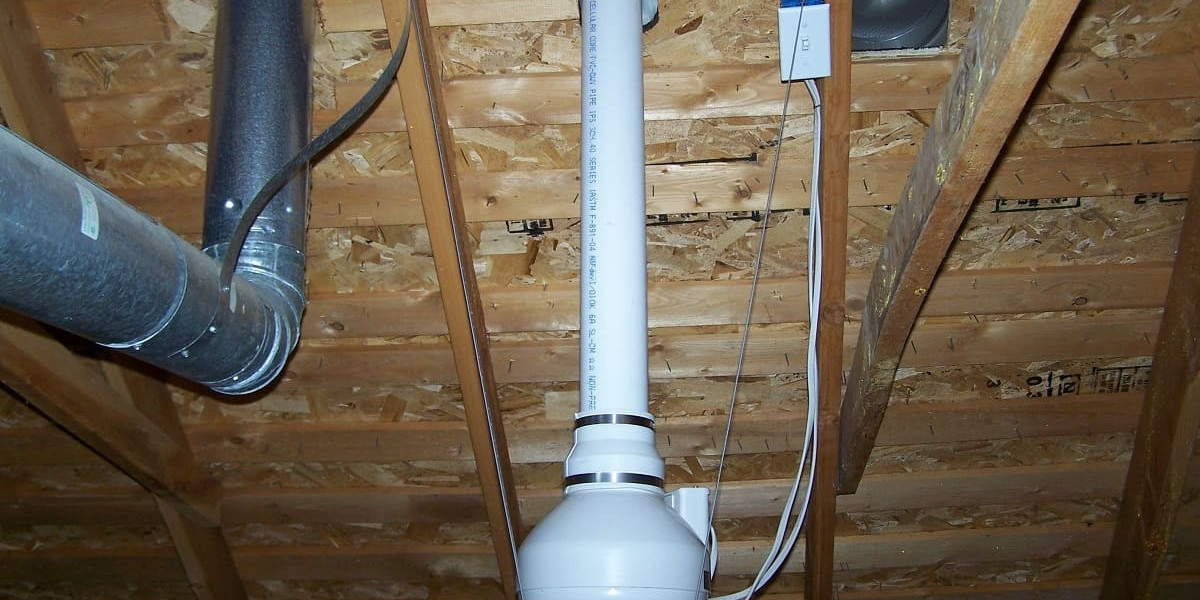
- Creating the Suction Point: The technician will drill a small, strategic hole (typically 3-4 inches in diameter) in your basement slab or in the crawl space membrane. This is the point where the radon gas will be actively drawn from beneath your home.
- Running the PVC Pipe: The pipe is run from the suction point to the exterior. If an interior route is chosen, the pipe will be discreetly run through a closet or basement ceiling and up into the attic. The goal is always to be as unobtrusive as possible. The pipe is sealed airtight at all connection points.
- Installing the Radon Fan: This is the heart of the system. The fan is installed in the attic or on the exterior of the house, above the living spaces. It’s not a typical fan; it’s a specially designed, durable unit that creates a constant vacuum under your home’s foundation, preventing radon from entering.
- Venting Above the Roofline: The pipe is extended to vent the radon gas safely above the roofline. This ensures the harmless, diluted gas is carried away from your windows and those of your neighbors.
Step 3: The Final Touches and System Check
- Sealing Major Entry Points: While the suction system is the primary solution, the contractor will also seal any large, obvious cracks in the foundation or gaps around sump pump lids to improve the system's efficiency.
- Installing the Manometer: This is a small, U-shaped gauge installed on the PVC pipe. It’s your visual indicator that the system is working. If the liquid in the two sides is level, the system is off. If one side is higher, the system is on and creating the necessary suction. You’ll walk by it every day and have instant peace of mind.
- The Walk-Through: A reputable contractor will never just leave. They will walk you through the entire system, show you how it works, explain what the manometer means, and answer any final questions.
What to Expect After Installation: Living with a Radon Mitigation System
Once the crew has cleaned up and left, your home life returns to normal—but with a powerful new layer of protection.
The Post-Mitigation Test
About 24 hours after the system is activated, a follow-up test should be conducted. This is non-negotiable. It verifies the system’s effectiveness. A professional will place their continuous monitor in your home for another 48-hour period to measure the new, reduced radon levels. Reputable companies often include this test in their service or strongly recommend it. The goal is to see a reading well below the 4.0 pCi/L action level, often below 2.0 pCi/L or even lower.
The Practicalities of Your New System
- Noise: A properly installed system is very quiet. You might hear a faint hum from the fan if it’s in your attic, but most homeowners report they quickly get used to it and don’t even notice it.
- Operation Cost: The fan runs continuously, but it uses about the same amount of electricity as a standard 60-watt light bulb, costing most Bowie homeowners between $50 and $150 per year.
- Maintenance: The system requires very little maintenance. Beyond visually checking the manometer to ensure it’s operating, the only foreseeable cost is replacing the fan unit, which has a typical lifespan of 10 years or more and costs a few hundred dollars.
The Ultimate Benefit: A Home That’s Truly Safe
The process of Radon Removal Bowie MD is a proven, straightforward solution to a serious problem. The investment, both in cost and the minor disruption of a one-day installation, pays dividends for years to come.
You are not just installing a piece of equipment. You are eliminating the second leading cause of lung cancer from your home. You are protecting your children as they play on the basement floor. You are ensuring the air you and your loved ones breathe every day is clean and safe. For homeowners in Bowie, from the older neighborhoods near the Patuxent River to the newer developments, this is an act of care for your most valuable asset—your family’s health and your home itself.